Accuracy versus precision, what’s the difference?
These two terms are often used interchangeably, which is incorrect. While “accurate” and “precise” are both important descriptive terms used to describe the characteristics of a measurement or series of measurements, their meanings vary greatly. So a precision measurement device can be accurate, but not precise, or precise, but not accurate, or both accurate & precise, or neither accurate nor precise. Let’s examine each of these terms a bit more closely to fully understand their differences.
Accuracy
Accuracy refers to how close a measurement is to the true (accepted) value. For example, let’s imagine a digital caliper is being tested using a traceable 1 mm gauge block. If the measurement produced by the caliper reads 1 mm, then the measurement reading produced is accurate. If the caliper produces a reading of anything else, ie. .5mm, or 1.3mm, etc., then the reading produced by the caliper is inaccurate. If the reading produced is inaccurate, the caliper must be serviced. The issue causing the inaccuracy could be something simple or complex. For example, in this case, replacing the battery, or powering the caliper off and then on again may cause it to produce accurate measurement readings. However, if the caliper has been dropped or mishandled in some way, it may require professional repair to produce accurate readings again. Now, just because this caliper produces accurate measurement readings doesn’t necessarily mean it is precise. Let’s examine precision a bit further below.

Precision
Precision refers to the reproducibility of a measurement, or how close various measurements are to one another. So, if a precision measurement device consistently produces the same readings, it is highly precise. This is true even if the measurement readings produced by the device are inaccurate. For example, if the digital caliper we tested in our earlier example is used to measure a traceable 1mm gage block, and consistently produces inaccurate measurement readings of .5mm, it is precise, even though it is inaccurate.
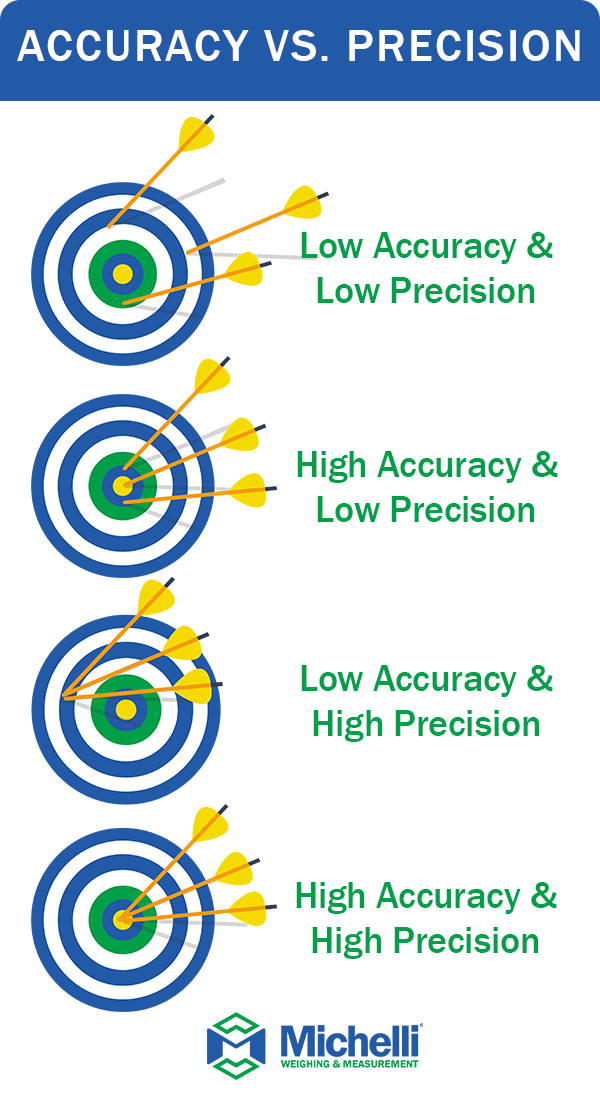
For clarification, let’s examine the infographic below.


- In the first image, the archer’s results are neither accurate nor precise. The results are inaccurate because the arrows have landed far from the bullseye. The results are not precise because they are inconsistent.
- In the second image, the archer’s arrows have landed very close to the bullseye. Their results are fairly accurate, given their proximity to the bullseye, but they are not precise, because they are inconsistent.
- In the third image, the archer’s results are inaccurate, but highly precise. The results are inaccurate because the arrows landed far from the bullseye. However, the arrows consistently landed in the same location, so the results are highly precise.
- In the fourth image, the archer’s results are both accurate and precise. The arrows have landed in the bullseye, and their location is consistent, meaning the archer hit the same spot repeatedly.
While both accuracy & precision are independently important, it’s crucial for for measurement equipment to produce readings that are both accurate and precise. A measurement instrument that produces readings that are both accurate and precise is producing readings that are reliable. The reproducibility of dependable results is what makes a tool useful. Imagine that caliper is being used to manufacture parts of a car engine. Inaccurate readings, or those with low precision, could contribute to the improper function of that engine. The results of that could be deadly. So it is imperative that the readings produced by the equipment are dependable.
Michelli Weighing & Measurement helps customers make certain that the measurement readings produced by their equipment is dependable. With ISO 17025 accredited precision measurement device calibration laboratories, traceable standards, and an expertly trained team of metrologists and service technicians, we help our customers ensure both accuracy and precision. We also provide the calibration certificates to help you document service dates, “as found” and “as left” readings, and more to document the calibration and traceability of your equipment. Most importantly, Michelli customers get free access to TRAC, our asset management system that helps you keep track of records, assets & calibration by housing all of your records for each asset in an online database, accessibly by you 24 hours a day, 7 days a week, 365 days a year.
Don’t choose accuracy OR precision, choose Michelli Weighing & Measurement and get both.
Send your equipment to our experts today & let us help you ensure BOTH accuracy & precision.
