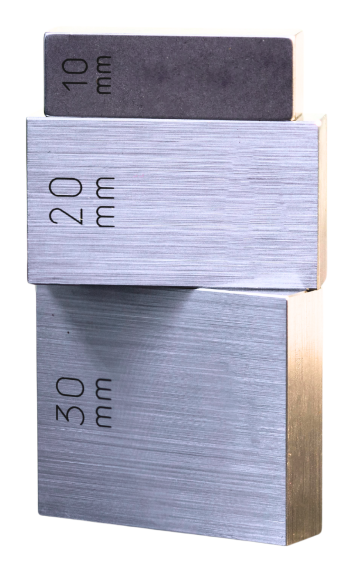
Where precision is necessary, it is essential that every part fits seamlessly, machines operate flawlessly, and that no measurement is questioned. How is that done? The answer is often found in a simple, but also powerful tool: gage blocks.
At Michelli Weighing & Measurement, accuracy is the cornerstone of everything we do. Gage blocks may appear small, but they are the foundation of modern dimensional measurement. From aerospace to agriculture, and energy to manufacturing, gage blocks ensure every instrument and system is calibrated to the highest standard. In this post, we’ll explore the history, science, calibration, and real-world uses of these little blocks, and why they matter to our customers.
A Swedish Solution to a Universal Problem
Carl Edvard Johansson was a Swedish engineer in the late 1800’s who would transform precision manufacturing. Johansson worked at a rifle factory and realized he needed a way to ensure consistency in the production of interchangeable parts. The solution to his problem is what we call “gage blocks”, or “Jo blocks” (for Johansson) today.
Johansson created flat metal blocks that could be stacked to make exact lengths. He also perfected the “wringing” technique, where blocks stick tightly together thanks to molecular attraction and surface effects. Although the wringing effect was known before Johansson, he was the first to use it practically for precise measurement. His innovation caught the attention of Henry Ford and became essential to the growth of mass production.

Calibration systems now include automated gage block comparators and machine-readable QR codes on gage blocks for tracking.
The Science Behind the Precision: What Are Gage Blocks?
Gage blocks might look simple, but they’re precision tools made from materials like hardened steel, tungsten carbide, or ceramic — with ceramic being especially popular for its stability and resistance to corrosion. They come in standard sizes, and each block is manufactured to an incredibly tight tolerance—typically in the micrometer (µm) or sub-micrometer range.
Gage blocks provide precision, stability, and repeatability. They are ground and polished to an incredibly flat and smooth surface, often within a few nanometers. That flatness is key for a process called wringing, where two blocks stick together almost like magnets, thanks to molecular attraction, vacuum pressure, and surface tension. When wrung together properly, they act as a single solid piece with virtually no air gap, making them ideal for building up extremely precise lengths.

What makes gage blocks even more impressive is their dimensional stability. They’re designed to resist wear, temperature changes, and corrosion — which is why materials like carbide and ceramic are now preferred over traditional steel. They’re also built to be accurate at a standard reference temperature of 20°C (68°F), because even small temperature changes can cause tiny shifts in length. That’s why Metrology labs keep their environments tightly controlled. Gage blocks are traceable to the fundamental length standard maintained by National Metrology Institutes. Since 1983, the meter has been defined by the distance light travels in a vacuum in 1/299,792,458 of a second—a precise, reproducible standard based on the speed of light. It’s this level of precision and reliability that makes them essential in high-end metrology.
At Michelli, we work with customers to ensure their equipment remains within the required tolerances by offering traceable calibration services. Michelli can help customers determine which material and grade suit their environment and application best.
How Metrology Labs Keep Gage Blocks on Check
Gage blocks must be calibrated regularly to maintain accuracy. Michelli Weighing & Measurement offers ISO 17025-accredited calibration services to help with this.
Mechanical Comparison
Labs use a comparator and a reference block to measure differences in length.
Interferometry
The most accurate method is by using laser light and interference patterns to measure down to nanometers.
Length Measuring Machines (LMM)
High-end systems that measure blocks under controlled conditions.
Each calibration includes a certificate documenting:
- Nominal
- Variation in Length
- Deviation of Length from Nominal
- Uncertainty
- Method used and Environmental conditions

Real-World Applications by Industry and Examples
|
Industry |
Gage Block Use |
Tolerance Sensitivity |
Example |
|
Machining |
Machine/tool setup |
±0.005 mm |
Calibrating micrometer |
|
Aerospace |
QA lab + CMM setup |
±0.001 mm |
Wing structure measurement |
|
Automotive |
Production line control |
±0.002 mm |
Valve stem inspection |
|
Tool & Die |
Angle/fixture setup |
±0.001 mm |
Sine bar angle creation |
|
Metrology Labs |
Reference calibration |
±0.0001 mm |
Laser interferometry |
|
Medical Devices |
Cleanroom QC |
±0.001 mm |
Implant diameter check |
|
Energy Sector |
Hazardous area checks |
±0.003 mm |
Pipe gauge calibration |
Why Gage Blocks Still Matter Today
Even though digital measurement tools and automation are on the rise, gage blocks remain reliable, stable, easy to use, and trusted for traceability universally. At Michelli, we use gage blocks to validate instruments before they’re sent to your job site, lab, or plant. They remain at the core of trusted measurement.
Choosing the Right Gage Block Set
|
|
Maintenance and Storage Best Practices:
|
Conclusion
Gage blocks may look humble, but their impact on precision manufacturing is enormous. They ensure that everything from jet engines to surgical implants are made to exacting standards. As the need for precision continues growing, gage blocks remain the trusted standard for many industries.
At Michelli Weighing & Measurement, we treat accuracy like a promise. Whether you’re calibrating a micrometer or verifying a CMM, our gage block calibration services are here to help you meet your standards with confidence!
Need help selecting or maintaining your gage blocks?
Michelli’s experts are ready to assist with recommendations and calibration services tailored to your industry.
